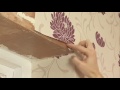
Papering Techniques for Window Recesses
Interactive Video
•
Design, Life Skills, Arts
•
7th - 10th Grade
•
Practice Problem
•
Hard

Mia Campbell
FREE Resource
Read more
6 questions
Show all answers
1.
MULTIPLE CHOICE QUESTION
30 sec • 1 pt
What is the first step in papering around a window?
Cutting the paper to size
Hanging the drop of paper over the window recess
Marking the window ledge
Trimming the edges
2.
MULTIPLE CHOICE QUESTION
30 sec • 1 pt
How should you mark the end of the window ledge?
With a knife
With your finger
With a ruler
With a pencil
3.
MULTIPLE CHOICE QUESTION
30 sec • 1 pt
What is the recommended distance to cut above the horizontal corner of the window recess?
1 to 2 mm
2 to 3 mm
4 to 5 mm
3 to 4 mm
4.
MULTIPLE CHOICE QUESTION
30 sec • 1 pt
What should you ensure when cutting a piece of paper to match the underside of the window recess?
It has a little extra to overlap
It is smaller than the recess
It is exactly the same size
It is a different color
5.
MULTIPLE CHOICE QUESTION
30 sec • 1 pt
What is the purpose of folding the excess paper underneath?
To create a decorative edge
To save paper
To make it easier to remove later
To match any pattern
6.
MULTIPLE CHOICE QUESTION
30 sec • 1 pt
What should be done after smoothing and trimming the paper?
Wipe any adhesive from the window
Leave it to dry
Add another layer of paper
Apply more adhesive
Access all questions and much more by creating a free account
Create resources
Host any resource
Get auto-graded reports
Continue with Google

Continue with Email
Continue with Classlink
Continue with Clever
or continue with
Microsoft
%20(1).png)
Apple
Others
Already have an account?
Similar Resources on Wayground

6 questions
CLEAN : Human Rights Watch denounces police behaviour in Chile
Interactive video
•
9th - 10th Grade
11 questions
Exploring Properties and Changes of Matter
Interactive video
•
6th - 10th Grade
11 questions
Exploring Chapter 15 of Bud Not Buddy
Interactive video
•
6th - 10th Grade
11 questions
Ocean Conservation and Sustainability Practices
Interactive video
•
5th - 10th Grade
11 questions
Understanding Sound and Music
Interactive video
•
5th - 10th Grade
Popular Resources on Wayground
8 questions
Spartan Way - Classroom Responsible
Quiz
•
9th - 12th Grade
15 questions
Fractions on a Number Line
Quiz
•
3rd Grade
14 questions
Boundaries & Healthy Relationships
Lesson
•
6th - 8th Grade
20 questions
Equivalent Fractions
Quiz
•
3rd Grade
3 questions
Integrity and Your Health
Lesson
•
6th - 8th Grade
25 questions
Multiplication Facts
Quiz
•
5th Grade
9 questions
FOREST Perception
Lesson
•
KG
20 questions
Main Idea and Details
Quiz
•
5th Grade
Discover more resources for Design
8 questions
Spartan Way - Classroom Responsible
Quiz
•
9th - 12th Grade
14 questions
Boundaries & Healthy Relationships
Lesson
•
6th - 8th Grade
3 questions
Integrity and Your Health
Lesson
•
6th - 8th Grade
7 questions
SMS Playground Expectations Quiz
Quiz
•
6th - 8th Grade
16 questions
Mario Trivia Challenge
Quiz
•
6th - 8th Grade
14 questions
SMS Car & Bus Expectations Quiz
Quiz
•
6th - 8th Grade
20 questions
Scatter Plots and Line of Best Fit
Quiz
•
8th Grade
12 questions
8th U6 L4 - Fitting a Line to Data
Quiz
•
8th Grade